I recently came across a need to send messages from a Raspberry Pi to an EV3 running the stock EV3 firmware and programmed in EV3-G. This pretty much limits the methods available to using the EV3-G Bluetooth Messaging block. The official documentation for this block is far from great. Luckily, there were some really good online resources for how to write the programs on the EV3 side as well as the Raspberry Pi side. Notably, I found the following resources extremely helpful:
https://www.hackster.io/KKE/raspberry-pi-lego-mindstorms-ev3-bluetooth-communication-aa42e2
http://www.geekdroppings.com/2018/01/21/raspberry-pi-and-the-lego-ev3-connected-by-bluetooth/
However, what these resources did not include was how to pair the EV3 with the Raspberry Pi. This took some digging and a lot of trial and error to accomplish. I found that the sequence shown below does indeed work. It should be noted that I’m performing this on a Raspberry Pi 3 B+ running the most up-to-date version of Raspbian as of the date that I’m authoring this post.
First and foremost, it is recommended to update the operating system and packages. Using a terminal window, type:
sudo apt-get upgrade
sudo apt-get update
Next, we need to install Bluez. Bluez is the official Linux stack for Bluetooth. You can find more information regarding the Bluez package at:
https://docs.ubuntu.com/core/en/stacks/bluetooth/bluez/docs/
Specifically, we need the RFCOMM implementation to allow us to treat the Bluetooth module as a serial interface. We also need the Bluetooth manager. To install the Bluez and the Bluetooth Manager packages, type:
sudo apt-get install bluetooth bluez bluemanAfter installing this, you need to reboot the Raspberry Pi. After the Pi reboots, you should now have two Bluetooth icons in the upper right corner of your desktop.
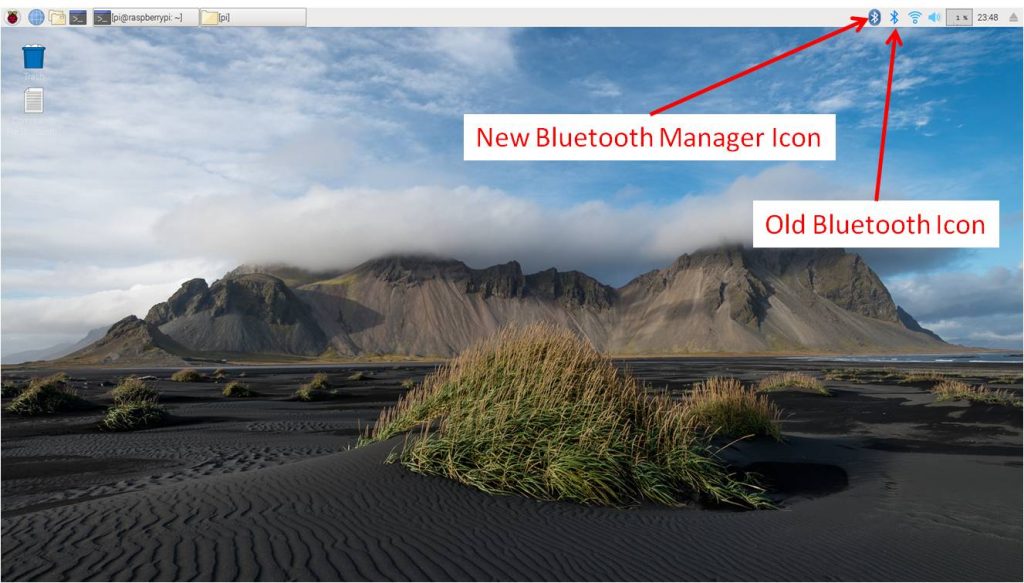
The next step is optional, but highly recommended. The default Bluetooth name for a Raspberry Pi is ‘raspberrypi,’ which is not very exciting. In particular, we intend to use our system at a robotics competition where there will likely be many Raspberry Pi’s. To avoid conflicts, and just to be more descriptive, let’s assign a new Bluetooth broadcast name. Create a new file named /etc/machine-info. To create this file, you can type:
sudo nano /etc/machine-infoor use whatever text editor you prefer if you don’t like nano. This should be a blank file unless you have already created this for another reason. Add the line:
PRETTY_HOSTNAME=deviceNamewhere deviceName is the broadcast name you would like to use for your Raspberry Pi. I used pecanPie for my name, but you can use whatever you’d like.
To start the pairing process, left click on the old Bluetooth icon, and it should open a drop down menu. Select “Make Discoverable.”

Make sure that the EV3 has Bluetooth enabled and that it is also discoverable by making sure that Visibility is turned on. The EV3 Bluetooth menu should look like this:

Using the “old” Bluetooth button, click on “Add Device.” The Raspberry Pi will then search for all available Bluetooth devices within range. My EV3 is currently named IGNIS (don’t ask, my son came up with the name).

Select your EV3 device, and click “Pair.” This will start the pairing process. The EV3 will ask you if you want to pair to your Raspberry Pi (pecanPie, in my case). Select yes.
 The EV3 will then prompt you for a 4-digit code. After you enter the code in the EV3, the Raspberry Pi will ask for the same code. The default LEGO code is simply 1234 as shown in the images below:

At this point, the devices should be paired, albeit not usable yet…
 Now we need to fix the services. Ultimately, we need to assign the Bluetooth to “rfcomm0” to make it act like a serial device. To do this, we need to use the new Bluetooth Manager that we just installed at the top of the page. Click on the new Bluetooth Manager, which should bring a drop down menu. Next, click on Devices.
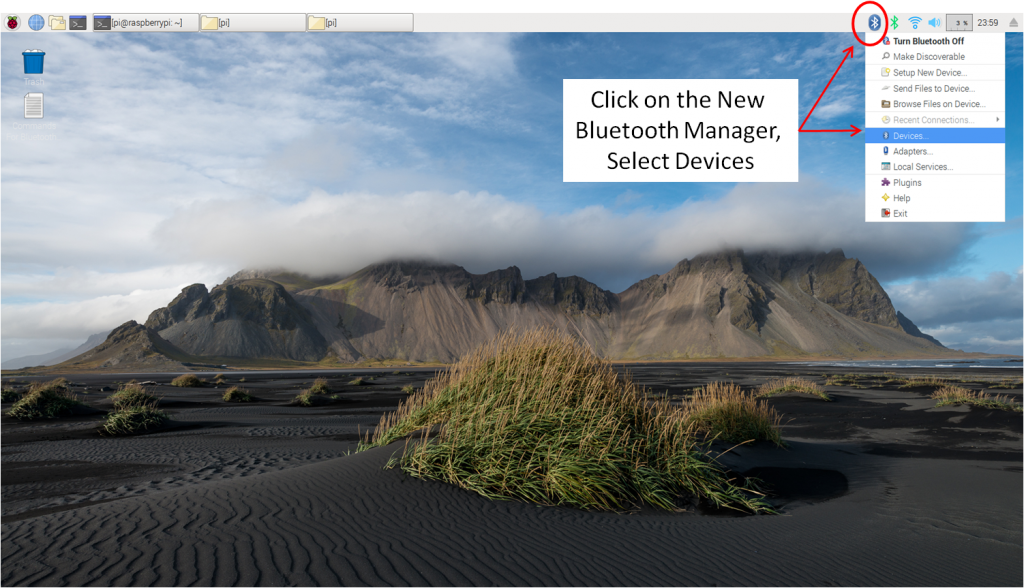
Clicking on Devices should result in a new window that allows you to select individual devices as shown below:
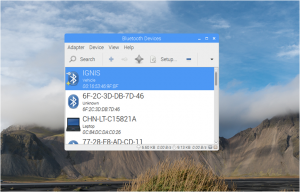 You should see your EV3 that you recently paired with your Raspberry Pi. Select your EV3, then click on “Setup.”
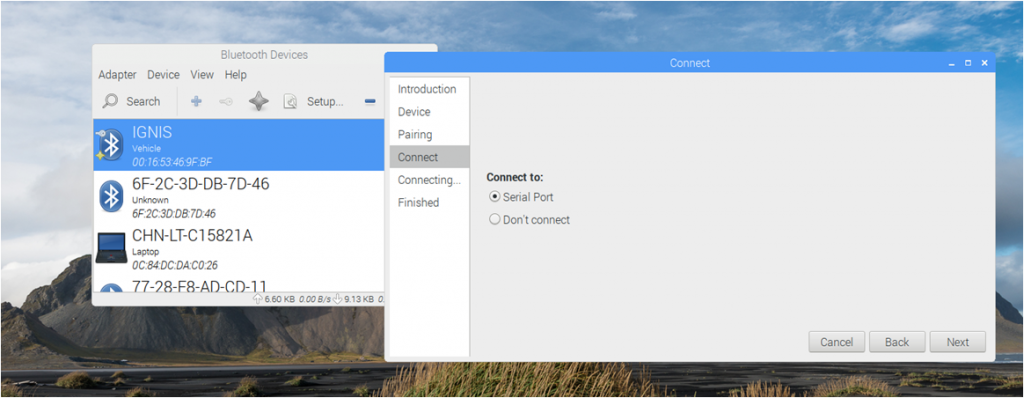
Select the option to “Connect to: Serial Port” and click on Next. If successful, it should bring up the message that it was successfully connected.
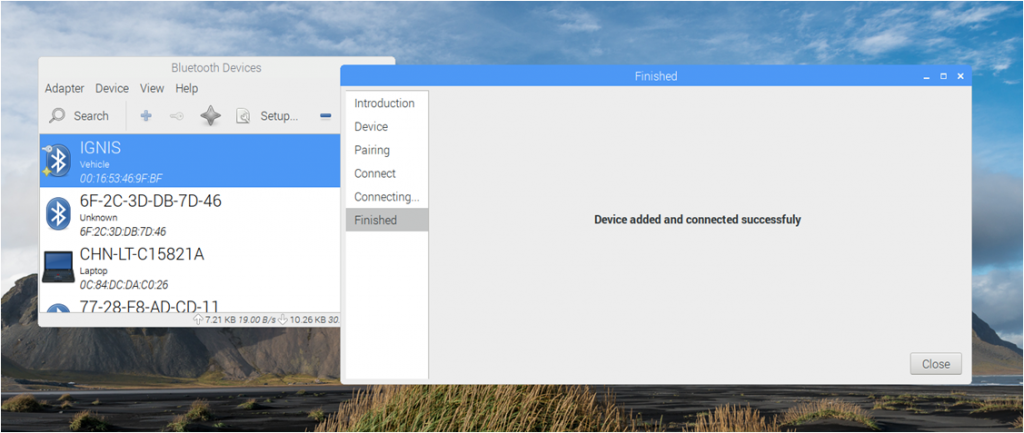
This process should have binded (bound?) the MAC id of the EV3 to the rfcomm0 serial handle. To verify that this has happened, open a terminal window and type:
ls /devIn this directory, you are looking for rfcomm0 (that is a zero at the end. The font in this style makes it appear more like the letter o…). If rfcomm0 is not listed, then something went wrong and the Bluetooth is not associated with a serial connection. If it is not there, don’t bother proceeding as you would need to fix the problem if any of the Python code is to work.

Assuming that everything went well, you can then use the links shown at the beginning of this page to write your EV3 program and Python program on your Raspberry Pi to send messages back and forth. The next portion covers an example of sending a message, and receiving a message. Note that I did not write any of the Bluetooth interface code, and probably cannot answer any questions regarding it. I’m using the Python code from:
http://www.geekdroppings.com/2018/01/21/raspberry-pi-and-the-lego-ev3-connected-by-bluetooth/
for all of the Bluetooth formatting, header formation, etc. The author of the above link, Maksym Shyte, did a great job setting these functions up and they do work.
For our example, we will send a text message of “Can you hear me?” from the Raspberry Pi to the EV3. Once the EV3 receives the message, it will wait for the user to press the center button, then send a message back of a Boolean value of True.

EV3-G does a terrible job of allowing meaningful comments within a program, so here is a step-by-step description of the blocks:
- Initialize the connection with our Raspberry Pi. This is necessary for all Bluetooth messaging. Make sure the name matches what you set up in the /etc/machine-info file. In my case, it’s called pecanPie.
- The next step is to wait for a Bluetooth message with a message title of ‘abc.’ You can use whatever you want, but the default is simply ‘abc.’ If you change this, you will have to modify the python code as it’s currently set up to send to abc. This block simply waits until you receive any message with this title. The type of the message is Text, as that’s what we will send from our Raspberry Pi.
- Once the wait block is completed (it receives the message), we print the contents of the text on the EV3 display and make a not so pleasant beep to wake up the user.
- We then prompt the user to press the button to response with some more display blocks.
- On the second line, there is a wait block that waits until the user presses the button.
- The EV3 then sends a Bluetooth message of Logic value of True to pecanPie.
- The last delay of 1 s is not necessary. It just stops the program from ending as abruptly.
The Python program that I used is below. Again, credit to Maksym Shyte for the functions as I simply copy/pasted from the geekdroppings post (link was provided above).
#! /usr/bin/env python3
import struct
import enum
import serial
import time


def printMessage(s):
    return ' '.join("{:02x}".format(c) for c in s)

class MessageType(enum.Enum):
    Text = 0
    Numeric = 1
    Logic = 2

def decodeMessage(s, msgType):
    payloadSize = struct.unpack_from('<H', s, 0)[0]

    if payloadSize < 5:       # includes the mailSize
        raise BufferError('Payload size is too small')

    a,b,c,d = struct.unpack_from('<4B', s, 2)
    if a != 1 or b != 0 or c != 0x81 or d != 0x9e:
        raise BufferError('Header is not correct.  Expecting 01 00 81 9e')

    mailSize = struct.unpack_from('<B', s, 6)[0]

    if payloadSize < (5 + mailSize):  # includes the valueSize
        raise BufferError('Payload size is too small')

    mailBytes = struct.unpack_from('<' + str(mailSize) + 's', s, 7)[0]
    mail = mailBytes.decode('ascii')[:-1]

    valueSize = struct.unpack_from('<H', s, 7 + mailSize)[0]
    if payloadSize < (7 + mailSize + valueSize):  # includes the valueSize
        raise BufferError('Payload size does not match the packet')

    if msgType == MessageType.Logic:
        if valueSize != 1:
            raise BufferError('Value size is not one byte required for Logic Type')
        valueBytes = struct.unpack_from('<B', s, 9 + mailSize)[0]
        value = True if valueBytes != 0 else False
    elif msgType == MessageType.Numeric:
        if valueSize != 4:
            raise BufferError('Value size is not four bytes required for Numeric Type')
        value = struct.unpack_from('<f', s, 9 + mailSize)[0]
    else:
        valueBytes = struct.unpack_from('<' + str(valueSize) + 's', s, 9 + mailSize)[0] value = valueBytes.decode('ascii')[:-1] remnant = None if len(s) > (payloadSize + 2):
        remnant = s[(payloadSize) + 2:]

    return (mail, value, remnant)

def encodeMessage(msgType, mail, value):
    mail = mail + '\x00'
    mailBytes = mail.encode('ascii')
    mailSize = len(mailBytes)
    fmt = '<H4BB' + str(mailSize) + 'sH'

    if msgType == MessageType.Logic:
        valueSize = 1
        valueBytes = 1 if value is True else 0
        fmt += 'B'
    elif msgType == MessageType.Numeric:
        valueSize = 4
        valueBytes = float(value)
        fmt += 'f'
    else:
        value = value + '\x00'
        valueBytes = value.encode('ascii')
        valueSize = len(valueBytes)
        fmt += str(valueSize) + 's'

    payloadSize = 7 + mailSize + valueSize
    s = struct.pack(fmt, payloadSize, 0x01, 0x00, 0x81, 0x9e, mailSize, mailBytes, valueSize, valueBytes)
    return s

if __name__ == "__main__":
    #Setup Serial Port
    EV3 = serial.Serial('/dev/rfcomm0')

    #-----Sending a message------
    #s is the message we want to send.  The encodeMessage sets up the
    #correct payload, sets up the Message Title, stuffs the bytes correctly, etc.
    s = encodeMessage(MessageType.Text, 'abc', 'Can you Hear Me?')
    #this next print is optional.  It just shows the full payload on the display.
    print('Sending the following message\n')
    print(printMessage(s))
    #the next line write the message to the bluetooth port and sends the command.
    EV3.write(s)
    time.sleep(1)

    #-----Receiving a Message----
    print('Listening for a message, press CTRL-C to quite.\n')
    messageReceived = False
    while not messageReceived:
        n=EV3.inWaiting()
        if n!= 0:
            s=EV3.read(n)
            print(s)
            mail,value,s=decodeMessage(s,MessageType.Logic)
            print(mail,value)
            messageReceived = True
        else:
            time.sleep(0.1)

    EV3.close()
To run this, start by running the EV3 program first as the EV3 simply waits for a message. If you run the RPi/Python first, it will send a message, but the EV3 program won’t be running to receive it. Below is a screen shot of the output of the program.

When the program sends a message, it outputs the contents of the encoded message on the display. Note that this step is optional, but does allow one to actually see what the encoding of the message is like. All of these pairs of numbers are single bytes, express in hexadecimal. The first 7 bytes are the payload header information. The next 3 bytes is the message title, or ‘abc.’ These are the ASCII values expressed in hex (a = 0x62, b = 0x63, c = 0x64). The next byte simply separates the value for the number of bytes in the message (0x11 bytes, or 16 bytes+1). The last group of bytes is the message itself. They are the 16 characters in the message, “Can you Hear Me?” expressed as ASCII codes in hex values.
The returned message is also printed out, both as the raw format, plus as the just the message title and message content.
There is a lot more that can be done with this. For example, there is no error checking to see if messages are actually received. I also have not tested any of this for floating point numbers, etc. The primary purpose of this blog post was to document the actual connection process between the EV3 to the Raspberry Pi and demonstrate some simple examples. I’m hoping in the future I can return to this and establish a more robust and higher level module for communicating between the two platforms.

Dear Andy,
what a great work! I tried and tried to get a BT Connection to EV3 with the newest Raspian Edition but it did not work. Your solution works by the first time!
If found a litttle copy-paste error in your python code in the decodeMessage function:
The else-case at the end has a line with more than one statement. It should be formatted like this (I think?):
else:
valueBytes = struct.unpack_from(‘ (payloadSize + 2):
remnant = s[(payloadSize) + 2:]
return (mail, value, remnant)
I also worked al lot with EV3 and realized two projects implementing neural networks in the EV3 (without using the raspi). If you like have a look at github.com/robodhhb
and first have a a look at the videos.
Best regards,
Detlef
Detlef,
Thanks for the comments and I’m glad that this has been helpful. I’ll take a look at your code suggestion. WordPress always does some funny formatting when I copy/paste into or out of it.
I’m having trouble seeing the video on GitHub. Do you have a YouTube link for it? My son has just started expressing an interest in machine learning and I need to stay about a week ahead of him or I become obsolete!
Thanks,
Andy
Hi Andy,
sorry, but I have not published the videos on YouTube. But here comes some help for accessing the Video and the other files:
1) Goto https://github.com/robodhhb/Gestur3Bot
2)On the right side you see the green button: “Clone or download”
3) Click it
4) Click “Download zip” and you will get the whole stuff
5)Save the zip file on your PC and unzip it.
6) Then you can see the videos (wmv-fiels) which you can open on a PC
7) See also the other Folders and readme-Files.
8) Have a little fun!
Best regards,
Detlef